通常、親コンポーネントから子コンポーネントへ情報は props 経由で渡します。しかし、props を介在する多くのコンポーネントに渡さなければならない場合、またはアプリケーションの多くのコンポーネントが同じ情報を必要とする場合、props の受け渡しは冗長で不便になる可能性があります。_コンテキスト_を使用すると、親コンポーネントは、ツリー内のその下にある任意のコンポーネント(どれだけ深くても)に、props を明示的に渡さずに、いくつかの情報を利用可能にすることができます。
学習内容
- 「prop drilling」とは何か
- 反復的な prop の受け渡しをコンテキストで置き換える方法
- コンテキストの一般的なユースケース
- コンテキストの一般的な代替手段
props を渡す際の問題点
Props の受け渡しは、UI ツリーを通じてデータを使用するコンポーネントに明示的にパイプする方法として優れています。
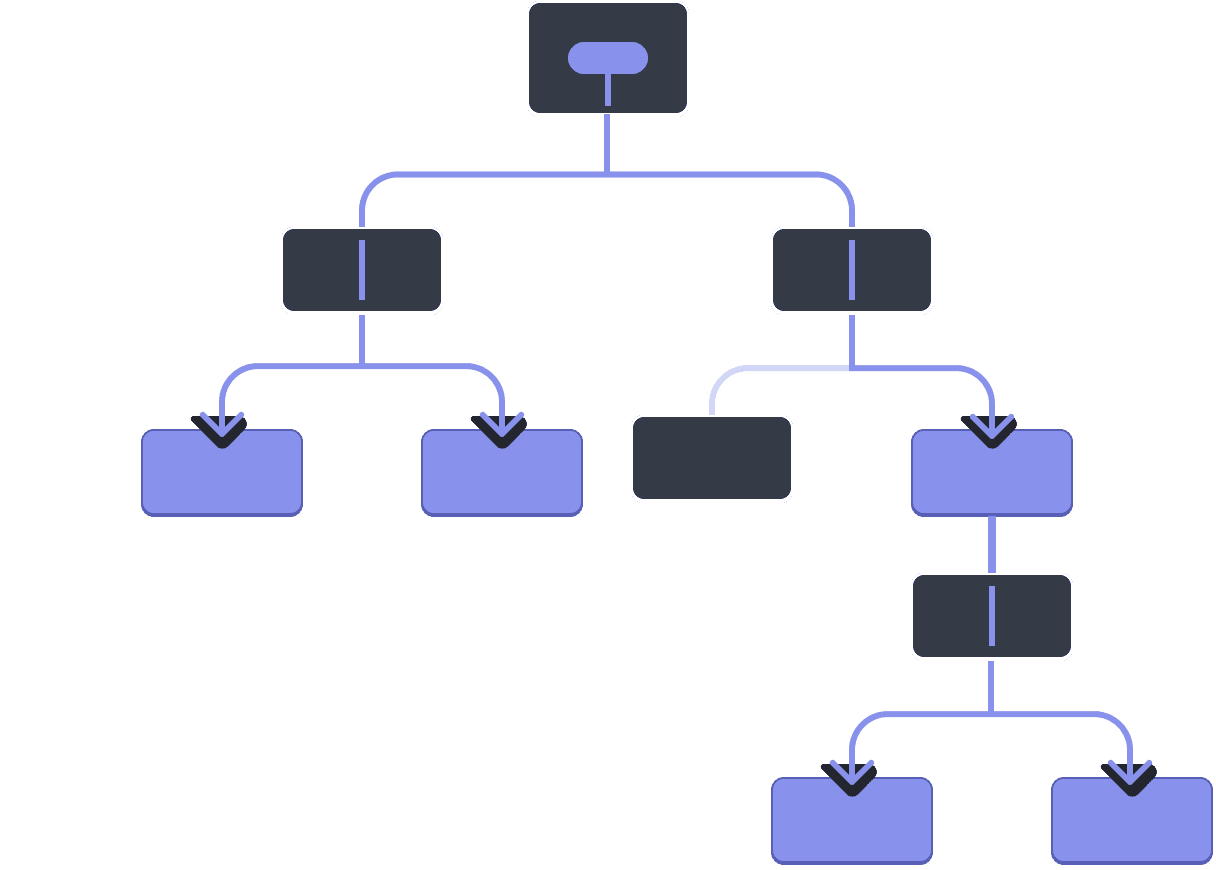
しかし、ツリーの奥深くに prop を渡す必要がある場合、または多くのコンポーネントが同じ prop を必要とする場合、props の受け渡しは冗長で不便になる可能性があります。最も近い共通の祖先は、データを必要とするコンポーネントから遠く離れている可能性があり、ステートを上位に持ち上げると、「prop drilling」と呼ばれる状況が発生する可能性があります。
ステートを上位に持ち上げる


Prop drilling
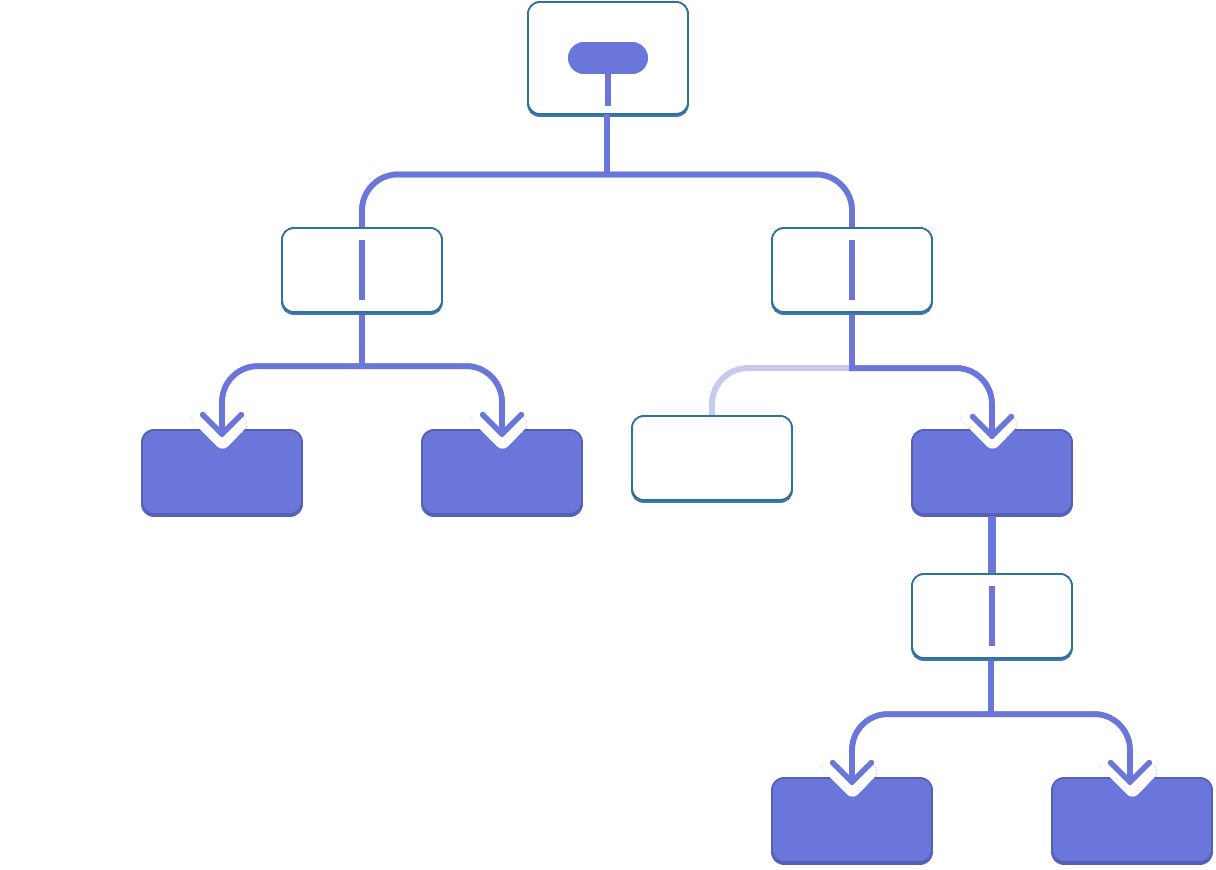
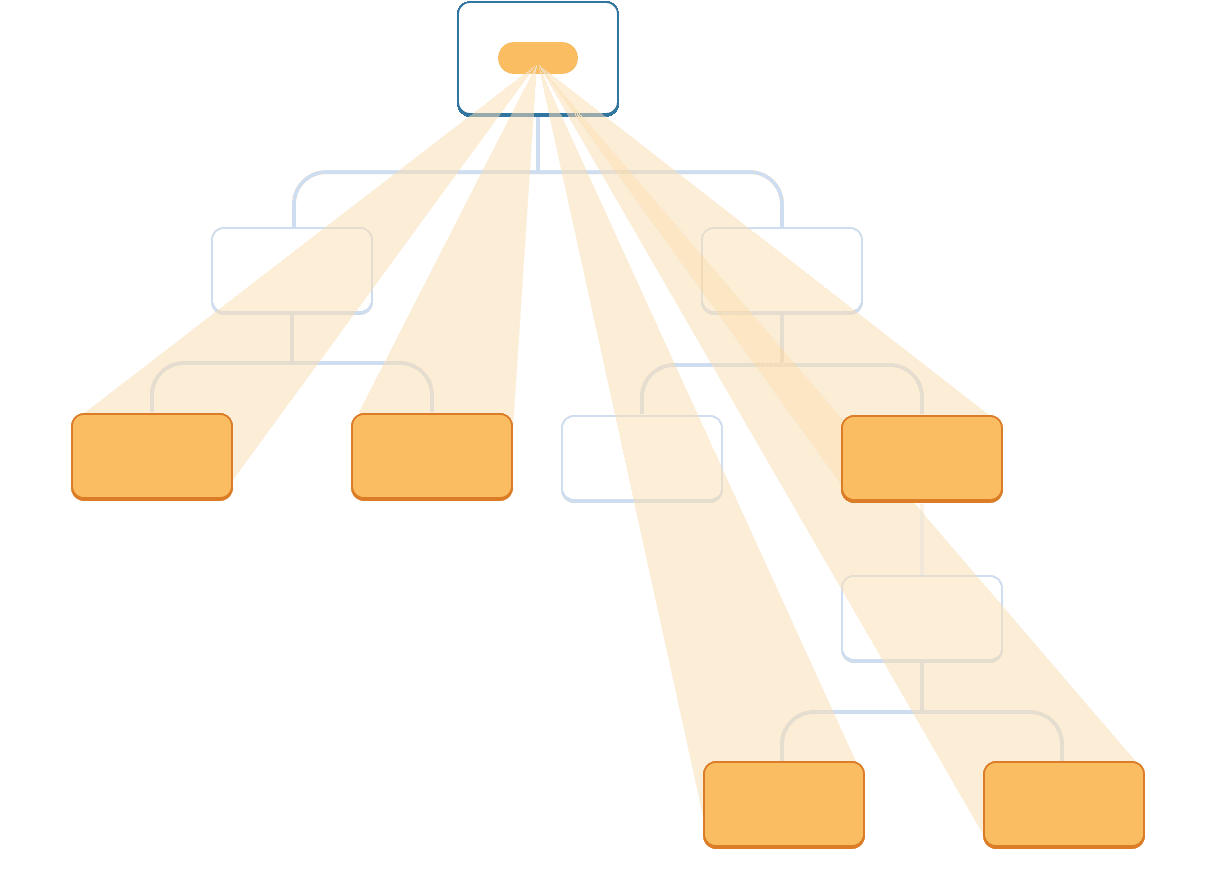
props を渡さずに、ツリー内でデータを必要とするコンポーネントに「テレポート」する方法があれば素晴らしいと思いませんか? React のコンテキスト機能を使用すれば、それが可能です。
コンテキスト: props の受け渡しの代替手段
コンテキストを使用すると、親コンポーネントはその下のツリー全体にデータを提供できます。コンテキストには多くの用途があります。次に例を示します。サイズの `レベル` を受け入れるこの `Heading` コンポーネントを考えてみましょう。
import Heading from './Heading.js';
import Section from './Section.js';

export default function Page() {
  return (
    <Section>
      <Heading level={1}>Title</Heading>
      <Heading level={2}>Heading</Heading>
      <Heading level={3}>Sub-heading</Heading>
      <Heading level={4}>Sub-sub-heading</Heading>
      <Heading level={5}>Sub-sub-sub-heading</Heading>
      <Heading level={6}>Sub-sub-sub-sub-heading</Heading>
    </Section>
  );
}
同じ `Section` 内の複数の見出しが常に同じサイズになるようにしたいとします。
import Heading from './Heading.js';
import Section from './Section.js';

export default function Page() {
  return (
    <Section>
      <Heading level={1}>Title</Heading>
      <Section>
        <Heading level={2}>Heading</Heading>
        <Heading level={2}>Heading</Heading>
        <Heading level={2}>Heading</Heading>
        <Section>
          <Heading level={3}>Sub-heading</Heading>
          <Heading level={3}>Sub-heading</Heading>
          <Heading level={3}>Sub-heading</Heading>
          <Section>
            <Heading level={4}>Sub-sub-heading</Heading>
            <Heading level={4}>Sub-sub-heading</Heading>
            <Heading level={4}>Sub-sub-heading</Heading>
          </Section>
        </Section>
      </Section>
    </Section>
  );
}
現在、`level` prop は各 `<Heading>` に個別に渡されています。
<Section>
  <Heading level={3}>About</Heading>
  <Heading level={3}>Photos</Heading>
  <Heading level={3}>Videos</Heading>
</Section>
`level` prop を `<Section>` コンポーネントに渡して、`<Heading>` から削除できると便利でしょう。こうすることで、同じセクション内のすべての見出しが同じサイズになるように強制できます。
<Section level={3}>
  <Heading>About</Heading>
  <Heading>Photos</Heading>
  <Heading>Videos</Heading>
</Section>
しかし、`<Heading>` コンポーネントは、最も近い `<Section>` のレベルをどのように知ることができるでしょうか? **そのためには、子がツリーの上位からデータを「要求」する方法が必要です。**
props だけではできません。ここでコンテキストが登場します。次の 3 つのステップで実行します。
- **コンテキストを作成する**。(見出しレベル用なので、`LevelContext` と呼ぶことができます。)
- **データを必要とするコンポーネントからそのコンテキストを使用する**。(`Heading` は `LevelContext` を使用します。)
- データを指定するコンポーネントからそのコンテキストを**提供**します。(
SectionはLevelContextを提供します。)
コンテキストを使用すると、親コンポーネント(たとえ遠い親であっても!)が内部のツリー全体にデータを提供できます。
近い子コンポーネントでコンテキストを使用する


遠い子コンポーネントでコンテキストを使用する

ステップ1:コンテキストを作成する
まず、コンテキストを作成する必要があります。コンポーネントが使用できるように、**ファイルからエクスポート**する必要があります。
import { createContext } from 'react';

export const LevelContext = createContext(1);
createContext への唯一の引数は*デフォルト*値です。ここでは、1 は最大のヘッディングレベルを指しますが、あらゆる種類の値(オブジェクトでも)を渡すことができます。デフォルト値の重要性は、次のステップで分かります。
ステップ2:コンテキストを使用する
React と、作成したコンテキストから useContext Hook をインポートします。
import { useContext } from 'react';
import { LevelContext } from './LevelContext.js';現在、Heading コンポーネントは props から level を読み取っています。
export default function Heading({ level, children }) {
  // ...
}代わりに、level prop を削除し、インポートしたコンテキスト LevelContext から値を読み取ります。
export default function Heading({ children }) {
  const level = useContext(LevelContext);
  // ...
}
useContext は Hook です。useState や useReducer と同様に、Hook は React コンポーネントの内部(ループや条件の中ではなく)でのみ呼び出すことができます。**useContext は、Heading コンポーネントが LevelContext を読み取りたいことを React に伝えます。**
Heading コンポーネントに level prop がなくなったので、JSX で Heading に level prop を渡す必要がなくなりました。
<Section>
  <Heading level={4}>Sub-sub-heading</Heading>
  <Heading level={4}>Sub-sub-heading</Heading>
  <Heading level={4}>Sub-sub-heading</Heading>
</Section>
JSX を更新して、代わりに Section がそれを受け取るようにします。
<Section level={4}>
  <Heading>Sub-sub-heading</Heading>
  <Heading>Sub-sub-heading</Heading>
  <Heading>Sub-sub-heading</Heading>
</Section>
念のため、これは動作させようとしていたマークアップです。
import Heading from './Heading.js';
import Section from './Section.js';

export default function Page() {
  return (
    <Section level={1}>
      <Heading>Title</Heading>
      <Section level={2}>
        <Heading>Heading</Heading>
        <Heading>Heading</Heading>
        <Heading>Heading</Heading>
        <Section level={3}>
          <Heading>Sub-heading</Heading>
          <Heading>Sub-heading</Heading>
          <Heading>Sub-heading</Heading>
          <Section level={4}>
            <Heading>Sub-sub-heading</Heading>
            <Heading>Sub-sub-heading</Heading>
            <Heading>Sub-sub-heading</Heading>
          </Section>
        </Section>
      </Section>
    </Section>
  );
}
この例はまだ完全には機能していないことに注意してください!すべての見出しのサイズが同じです。なぜなら、**コンテキストを*使用*しているにもかかわらず、まだ*提供*していないからです。** React はどこからそれを取得すればよいか分かりません!
コンテキストを提供しない場合、React は前のステップで指定したデフォルト値を使用します。この例では、createContext の引数として 1 を指定したので、useContext(LevelContext) は 1 を返し、すべての見出しを <h1> に設定します。各 Section が独自のコンテキストを提供するようにすることで、この問題を修正しましょう。
ステップ3:コンテキストを提供する
Section コンポーネントは現在、その子要素をレンダリングしています。
export default function Section({ children }) {
  return (
    <section className="section">
      {children}
    </section>
  );
}**それらをコンテキストプロバイダーでラップ**して、LevelContext をそれらに提供します。
import { LevelContext } from './LevelContext.js';

export default function Section({ level, children }) {
  return (
    <section className="section">
      <LevelContext.Provider value={level}>
        {children}
      </LevelContext.Provider>
    </section>
  );
}
これは React に次のように伝えます。「この <Section> 内のコンポーネントが LevelContext を要求する場合、この level を与えます。」 コンポーネントは、UI ツリー内でその上にある最も近い <LevelContext.Provider> の値を使用します。
import Heading from './Heading.js';
import Section from './Section.js';

export default function Page() {
  return (
    <Section level={1}>
      <Heading>Title</Heading>
      <Section level={2}>
        <Heading>Heading</Heading>
        <Heading>Heading</Heading>
        <Heading>Heading</Heading>
        <Section level={3}>
          <Heading>Sub-heading</Heading>
          <Heading>Sub-heading</Heading>
          <Heading>Sub-heading</Heading>
          <Section level={4}>
            <Heading>Sub-sub-heading</Heading>
            <Heading>Sub-sub-heading</Heading>
            <Heading>Sub-sub-heading</Heading>
          </Section>
        </Section>
      </Section>
    </Section>
  );
}
元のコードと同じ結果になりますが、各 Heading コンポーネントに level prop を渡す必要はありませんでした!代わりに、上にある最も近い Section に問い合わせることで、見出しレベルを「把握」します。
<Section>にlevelprop を渡します。Sectionは、その子要素を<LevelContext.Provider value={level}>でラップします。Headingは、useContext(LevelContext)を使用して、上にある最も近いLevelContextの値を問い合わせます。
同じコンポーネントからコンテキストを使用および提供する
現在でも、各セクションの level を手動で指定する必要があります。
export default function Page() {
  return (
    <Section level={1}>
      ...
      <Section level={2}>
        ...
        <Section level={3}>
...コンテキストを使用すると、上位のコンポーネントから情報を読み取ることができるため、各`Section`は、上位の`Section`から`level`を読み取り、`level + 1`を自動的に下位に渡すことができます。具体的な方法を以下に示します。
import { useContext } from 'react';
import { LevelContext } from './LevelContext.js';

export default function Section({ children }) {
  const level = useContext(LevelContext);
  return (
    <section className="section">
      <LevelContext.Provider value={level + 1}>
        {children}
      </LevelContext.Provider>
    </section>
  );
}この変更により、`level` propを`<Section>`または`<Heading>`のいずれにも渡す必要がなくなります。
import Heading from './Heading.js';
import Section from './Section.js';

export default function Page() {
  return (
    <Section>
      <Heading>Title</Heading>
      <Section>
        <Heading>Heading</Heading>
        <Heading>Heading</Heading>
        <Heading>Heading</Heading>
        <Section>
          <Heading>Sub-heading</Heading>
          <Heading>Sub-heading</Heading>
          <Heading>Sub-heading</Heading>
          <Section>
            <Heading>Sub-sub-heading</Heading>
            <Heading>Sub-sub-heading</Heading>
            <Heading>Sub-sub-heading</Heading>
          </Section>
        </Section>
      </Section>
    </Section>
  );
}
これで、`Heading`と`Section`はどちらも`LevelContext`を読み取って、自身の階層の深さを判断します。そして、`Section`は、子要素を`LevelContext`でラップすることで、その内部の要素がより深い階層にあることを指定します。
コンテキストは、中間コンポーネントを透過的に渡します
コンテキストを提供するコンポーネントと使用するコンポーネントの間に、`<div>`などの組み込みコンポーネントと、独自に作成したコンポーネントの両方を含む、任意の数のコンポーネントを挿入できます。
この例では、同じ`Post`コンポーネント(破線で囲まれた)が2つの異なるネストレベルでレンダリングされています。その内部の`<Heading>`は、最も近い`<Section>`からレベルを自動的に取得していることに注意してください。
import Heading from './Heading.js';
import Section from './Section.js';

export default function ProfilePage() {
  return (
    <Section>
      <Heading>My Profile</Heading>
      <Post
        title="Hello traveller!"
        body="Read about my adventures."
      />
      <AllPosts />
    </Section>
  );
}

function AllPosts() {
  return (
    <Section>
      <Heading>Posts</Heading>
      <RecentPosts />
    </Section>
  );
}

function RecentPosts() {
  return (
    <Section>
      <Heading>Recent Posts</Heading>
      <Post
        title="Flavors of Lisbon"
        body="...those pastéis de nata!"
      />
      <Post
        title="Buenos Aires in the rhythm of tango"
        body="I loved it!"
      />
    </Section>
  );
}

function Post({ title, body }) {
  return (
    <Section isFancy={true}>
      <Heading>
        {title}
      </Heading>
      <p><i>{body}</i></p>
    </Section>
  );
}
これが機能するために特別なことは何もしていません。`Section`は、その内部のツリーのコンテキストを指定するため、`<Heading>`をどこに挿入しても、正しいサイズになります。上記のサンドボックスで試してみてください!
コンテキストを使用すると、「周囲に適応」し、レンダリングされる場所(つまり、どのコンテキストでレンダリングされるか)に応じて表示方法が異なるコンポーネントを作成できます。
コンテキストの仕組みは、CSSプロパティの継承を思い起こさせるかもしれません。CSSでは、`<div>`に`color: blue`を指定すると、その内部のDOMノードは、どれだけ深くても、途中のDOMノードが`color: green`でオーバーライドしない限り、その色を継承します。同様に、Reactでは、上位から来るコンテキストをオーバーライドする唯一の方法は、子要素を異なる値を持つコンテキストプロバイダーでラップすることです。
CSSでは、`color`や`background-color`のような異なるプロパティは、互いにオーバーライドしません。すべての`<div>`の`color`を赤に設定しても、`background-color`には影響しません。同様に、**異なるReactコンテキストは互いにオーバーライドしません。** `createContext()`で作成した各コンテキストは、他のコンテキストとは完全に分離されており、**その特定の**コンテキストを使用および提供するコンポーネントを結び付けます。1つのコンポーネントは、問題なく多くの異なるコンテキストを使用または提供できます。
コンテキストを使用する前に
コンテキストは非常に魅力的です!しかし、これは使いすぎるのも簡単であることを意味します。**いくつかのpropを複数階層深く渡す必要があるからといって、その情報をコンテキストに配置する必要があるとは限りません。**
コンテキストを使用する前に検討すべき代替案を以下に示します。
- **まずはpropを渡すことから始めましょう。** コンポーネントが些細なものでない場合、12個のpropを12個のコンポーネントに渡すことは珍しくありません。面倒に感じるかもしれませんが、どのコンポーネントがどのデータを使用しているかを明確にします!コードを保守する人は、propを使用してデータフローを明示的にしたことに感謝するでしょう。
- **コンポーネントを抽出し、JSXを`
children`として渡します。** そのデータを使用しない(そしてさらに下に渡すだけ)複数の中間コンポーネントのレイヤーを介してデータを渡す場合、これは多くの場合、途中でいくつかのコンポーネントを抽出するのを忘れたことを意味します。たとえば、`posts`のようなデータpropを、`<Layout posts={posts} />`のような、それらを直接使用しない視覚コンポーネントに渡す場合があります。代わりに、`Layout`に`children`をpropとして受け取らせ、`<Layout><Posts posts={posts} /></Layout>`をレンダリングします。これにより、データを指定するコンポーネントとデータが必要なコンポーネントの間のレイヤー数が削減されます。
これらのアプローチのいずれもうまくいかない場合は、コンテキストを検討してください。
コンテキストのユースケース
- **テーマ設定:** アプリでユーザーが外観を変更できるようにする場合(例:ダークモード)、アプリの上部にコンテキストプロバイダーを配置し、視覚的な外観を調整する必要があるコンポーネントでそのコンテキストを使用できます。
- 現在のアカウント:多くのコンポーネントは、現在ログインしているユーザーを知る必要があるかもしれません。コンテキストに配置することで、ツリー内のどこからでも簡単に読み取ることができます。一部のアプリでは、複数のアカウントを同時に操作することもできます(例:別のユーザーとしてコメントを残すため)。このような場合は、UIの一部を異なる現在のアカウント値を持つネストされたプロバイダーでラップすると便利です。
- ルーティング:ほとんどのルーティングソリューションは、現在のルートを保持するために内部でコンテキストを使用します。これは、すべてのリンクがアクティブかどうかを「認識」する方法です。独自のルーターを構築する場合は、これを行うこともできます。
- 状態の管理:アプリが成長するにつれて、アプリの上部に多くの状態が集中する可能性があります。下位にある多くのコンポーネントがそれを変更したい場合があります。複雑な状態を管理し、それを下位のコンポーネントに手間をかけずに渡すために、リデューサーとコンテキストを一緒に使用するのが一般的です。
コンテキストは静的な値に限定されません。次回のレンダリングで異なる値を渡すと、React はそれを読み取る以下のすべてのコンポーネントを更新します!これが、コンテキストが状態と組み合わせてよく使用される理由です。
一般的に、ツリーのさまざまな部分にある離れたコンポーネントで何らかの情報が必要な場合は、コンテキストが役立つことを示す良い兆候です。
要約...
- コンテキストを使用すると、コンポーネントはそれ以下のツリー全体に何らかの情報を提供できます。
- コンテキストを渡すには
export const MyContext = createContext(defaultValue)を使用して作成およびエクスポートします。- どれだけ深くても、子コンポーネントでそれを読み取るには、
useContext(MyContext)Hook に渡します。 - 親から提供するには、子を
<MyContext.Provider value={...}>でラップします。
- コンテキストは、途中のコンポーネントを透過的に通過します。
- コンテキストを使用すると、「周囲に適応する」コンポーネントを作成できます。
- コンテキストを使用する前に、props を渡すか、JSX を
childrenとして渡してみてください。
いくつかのチャレンジを試してみましょう...
チャレンジ 1の 1: コンテキストで prop ドリリングを置き換える...
この例では、チェックボックスを切り替えると、各 <PlaceImage> に渡される imageSize prop が変更されます。チェックボックスの状態はトップレベルの App コンポーネントに保持されますが、各 <PlaceImage> はそれを認識する必要があります。
現在、App は imageSize を List に渡し、List はそれを各 Place に渡し、Place はそれを PlaceImage に渡します。imageSize prop を削除し、代わりに App コンポーネントから PlaceImage に直接渡します。
Context.js でコンテキストを宣言できます。
import { useState } from 'react';
import { places } from './data.js';
import { getImageUrl } from './utils.js';

export default function App() {
  const [isLarge, setIsLarge] = useState(false);
  const imageSize = isLarge ? 150 : 100;
  return (
    <>
      <label>
        <input
          type="checkbox"
          checked={isLarge}
          onChange={e => {
            setIsLarge(e.target.checked);
          }}
        />
        Use large images
      </label>
      <hr />
      <List imageSize={imageSize} />
    </>
  )
}

function List({ imageSize }) {
  const listItems = places.map(place =>
    <li key={place.id}>
      <Place
        place={place}
        imageSize={imageSize}
      />
    </li>
  );
  return <ul>{listItems}</ul>;
}

function Place({ place, imageSize }) {
  return (
    <>
      <PlaceImage
        place={place}
        imageSize={imageSize}
      />
      <p>
        <b>{place.name}</b>
        {': ' + place.description}
      </p>
    </>
  );
}

function PlaceImage({ place, imageSize }) {
  return (
    <img
      src={getImageUrl(place)}
      alt={place.name}
      width={imageSize}
      height={imageSize}
    />
  );
}