状態はコンポーネント間で独立しています。 React は、UI ツリー内の配置に基づいて、どの状態がどのコンポーネントに属しているかを追跡します。再レンダリング間で状態を保持するタイミングとリセットするタイミングを制御できます。
学習内容
- React が状態を保持またはリセットするタイミング
- React にコンポーネントの状態を強制的にリセットさせる方法
- key と type が状態の保持にどのように影響するか
状態はレンダーツリー内の位置に関連付けられています
React は、UI のコンポーネント構造に基づいてレンダーツリーを構築します。
コンポーネントに状態を与えると、状態はコンポーネントの「内部」に存在すると考えるかもしれません。しかし、状態は実際には React の内部に保持されています。 React は、保持している状態の各部分を、レンダーツリー内のコンポーネントの位置によって正しいコンポーネントに関連付けます。
ここでは、`
import { useState } from 'react';

export default function App() {
  const counter = <Counter />;
  return (
    <div>
      {counter}
      {counter}
    </div>
  );
}

function Counter() {
  const [score, setScore] = useState(0);
  const [hover, setHover] = useState(false);

  let className = 'counter';
  if (hover) {
    className += ' hover';
  }

  return (
    <div
      className={className}
      onPointerEnter={() => setHover(true)}
      onPointerLeave={() => setHover(false)}
    >
      <h1>{score}</h1>
      <button onClick={() => setScore(score + 1)}>
        Add one
      </button>
    </div>
  );
}
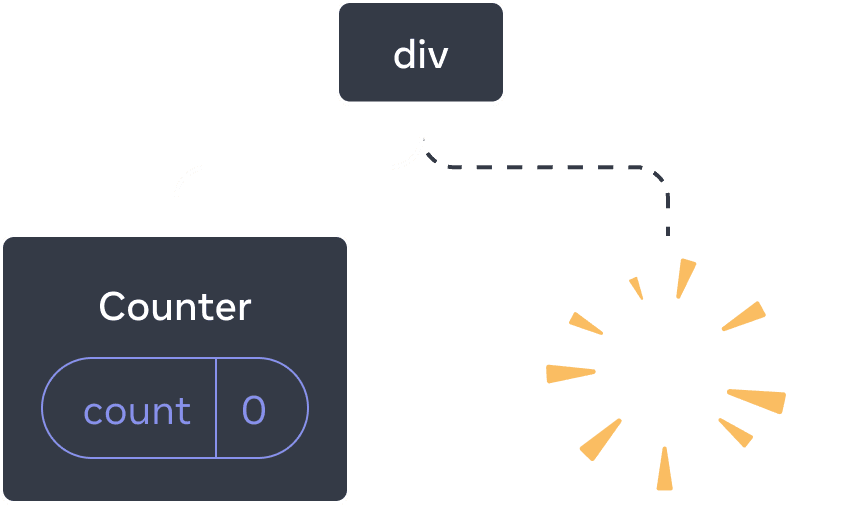
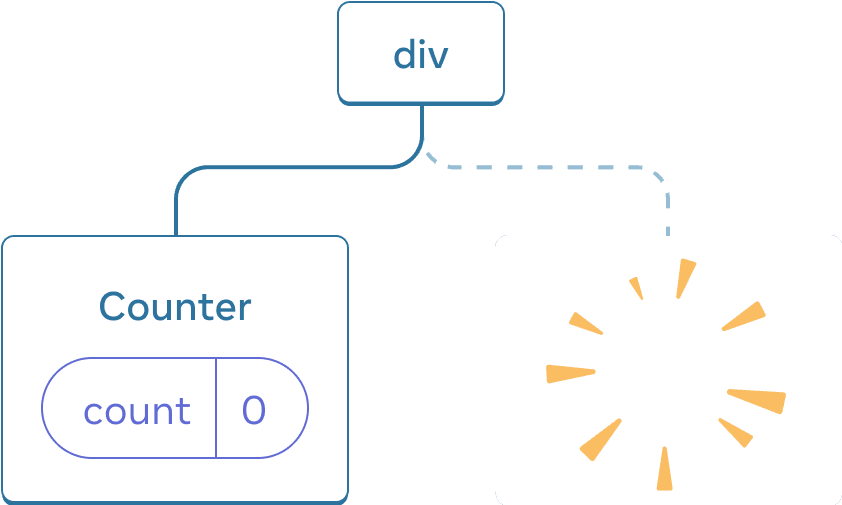
ツリー構造は以下のようになります。
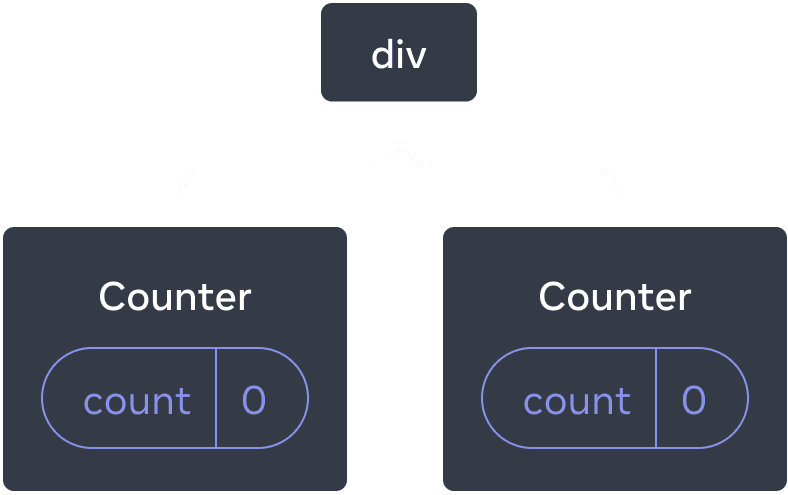
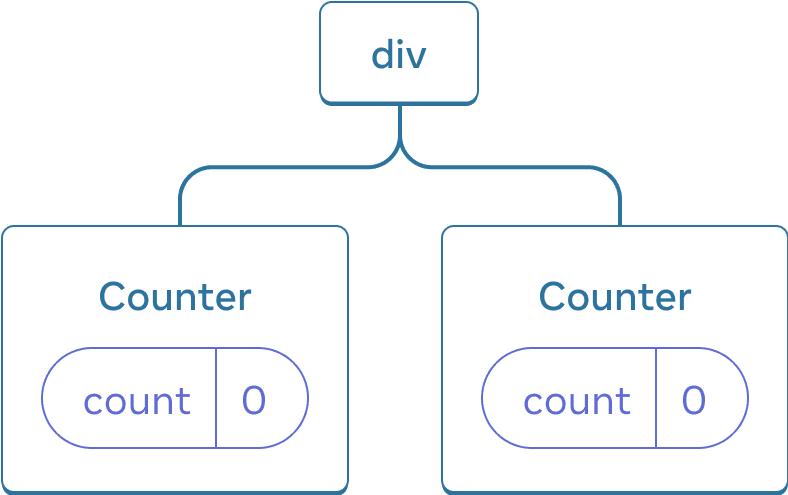
React ツリー
**これらは 2 つの別々のカウンターです。それぞれがツリー内の異なる位置にレンダリングされているためです。** 通常、React を使用する際にこれらの位置について考える必要はありませんが、仕組みを理解しておくと役に立つ場合があります。
React では、画面上の各コンポーネントは完全に独立した状態を持っています。たとえば、2 つの `Counter` コンポーネントを並べてレンダリングすると、それぞれが独自の独立した `score` と `hover` 状態を取得します。
両方のカウンターをクリックしてみてください。互いに影響を与えないことに注意してください。
import { useState } from 'react';

export default function App() {
  return (
    <div>
      <Counter />
      <Counter />
    </div>
  );
}

function Counter() {
  const [score, setScore] = useState(0);
  const [hover, setHover] = useState(false);

  let className = 'counter';
  if (hover) {
    className += ' hover';
  }

  return (
    <div
      className={className}
      onPointerEnter={() => setHover(true)}
      onPointerLeave={() => setHover(false)}
    >
      <h1>{score}</h1>
      <button onClick={() => setScore(score + 1)}>
        Add one
      </button>
    </div>
  );
}
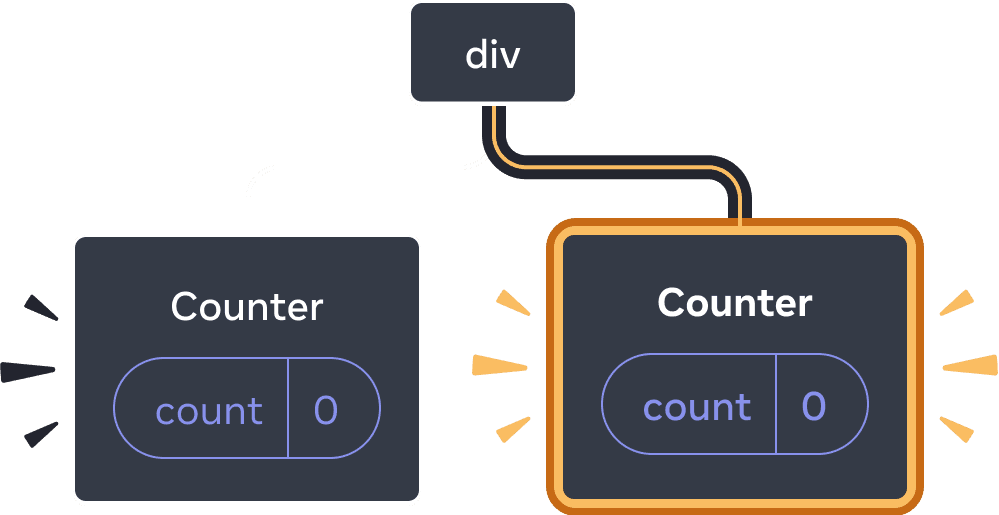
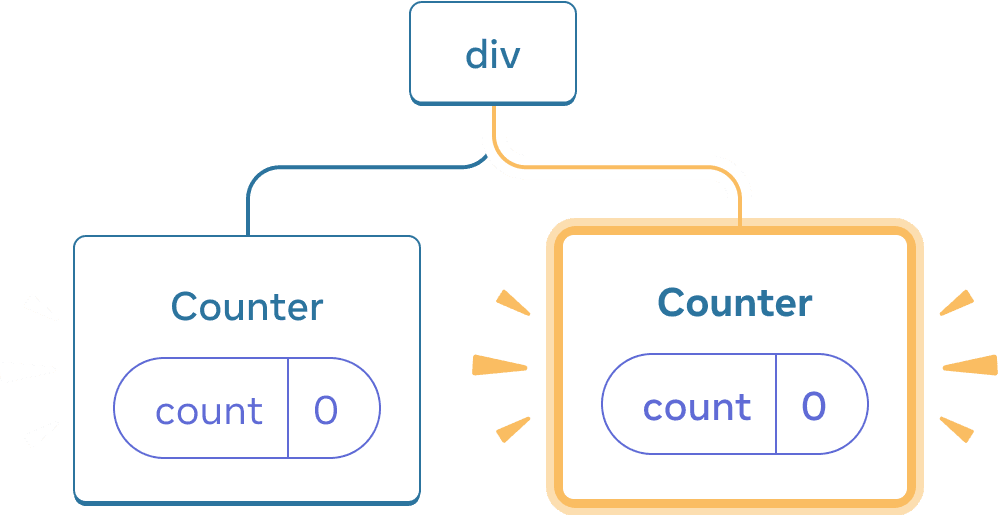
ご覧のとおり、1 つのカウンターが更新されると、そのコンポーネントの状態のみが更新されます。
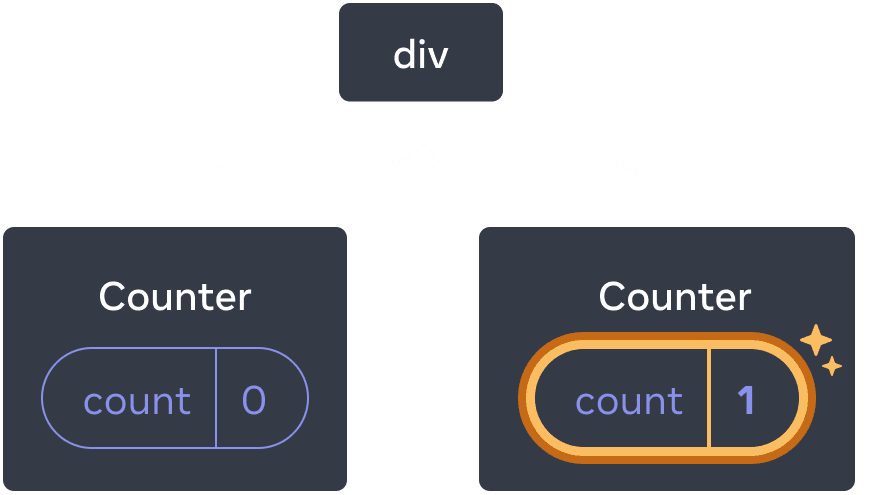
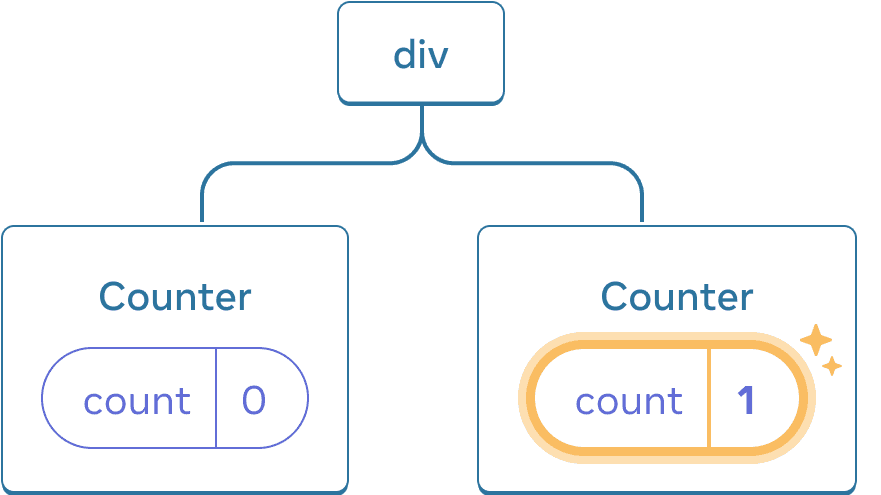
状態の更新
React は、ツリー内の同じ位置に同じコンポーネントをレンダリングしている限り、状態を保持します。これを確認するには、両方のカウンターを増やし、「2 番目のカウンターをレンダリングする」チェックボックスをオフにして 2 番目のコンポーネントを削除し、もう一度オンにして追加します。
import { useState } from 'react';

export default function App() {
  const [showB, setShowB] = useState(true);
  return (
    <div>
      <Counter />
      {showB && <Counter />}
      <label>
        <input
          type="checkbox"
          checked={showB}
          onChange={e => {
            setShowB(e.target.checked)
          }}
        />
        Render the second counter
      </label>
    </div>
  );
}

function Counter() {
  const [score, setScore] = useState(0);
  const [hover, setHover] = useState(false);

  let className = 'counter';
  if (hover) {
    className += ' hover';
  }

  return (
    <div
      className={className}
      onPointerEnter={() => setHover(true)}
      onPointerLeave={() => setHover(false)}
    >
      <h1>{score}</h1>
      <button onClick={() => setScore(score + 1)}>
        Add one
      </button>
    </div>
  );
}
2 番目のカウンターのレンダリングを停止すると、その状態が完全に消えることに注意してください。これは、React がコンポーネントを削除すると、その状態も破棄するためです。
コンポーネントの削除
「2 番目のカウンターをレンダリングする」をオンにすると、2 番目の `Counter` とその状態が最初から初期化され(`score = 0`)、DOM に追加されます。
コンポーネントの追加
**React は、コンポーネントが UI ツリー内の位置にレンダリングされている限り、その状態を保持します。** コンポーネントが削除された場合、または別のコンポーネントが同じ位置にレンダリングされた場合、React はその状態を破棄します。
同じ位置にある同じコンポーネントは状態を保持します
この例では、2 つの異なる `
import { useState } from 'react';

export default function App() {
  const [isFancy, setIsFancy] = useState(false);
  return (
    <div>
      {isFancy ? (
        <Counter isFancy={true} />
      ) : (
        <Counter isFancy={false} />
      )}
      <label>
        <input
          type="checkbox"
          checked={isFancy}
          onChange={e => {
            setIsFancy(e.target.checked)
          }}
        />
        Use fancy styling
      </label>
    </div>
  );
}

function Counter({ isFancy }) {
  const [score, setScore] = useState(0);
  const [hover, setHover] = useState(false);

  let className = 'counter';
  if (hover) {
    className += ' hover';
  }
  if (isFancy) {
    className += ' fancy';
  }

  return (
    <div
      className={className}
      onPointerEnter={() => setHover(true)}
      onPointerLeave={() => setHover(false)}
    >
      <h1>{score}</h1>
      <button onClick={() => setScore(score + 1)}>
        Add one
      </button>
    </div>
  );
}
チェックボックスをオンまたはオフにしても、カウンターの状態はリセットされません。 `isFancy` が `true` または `false` のいずれであっても、ルート `App` コンポーネントから返される `div` の最初の子として常に `
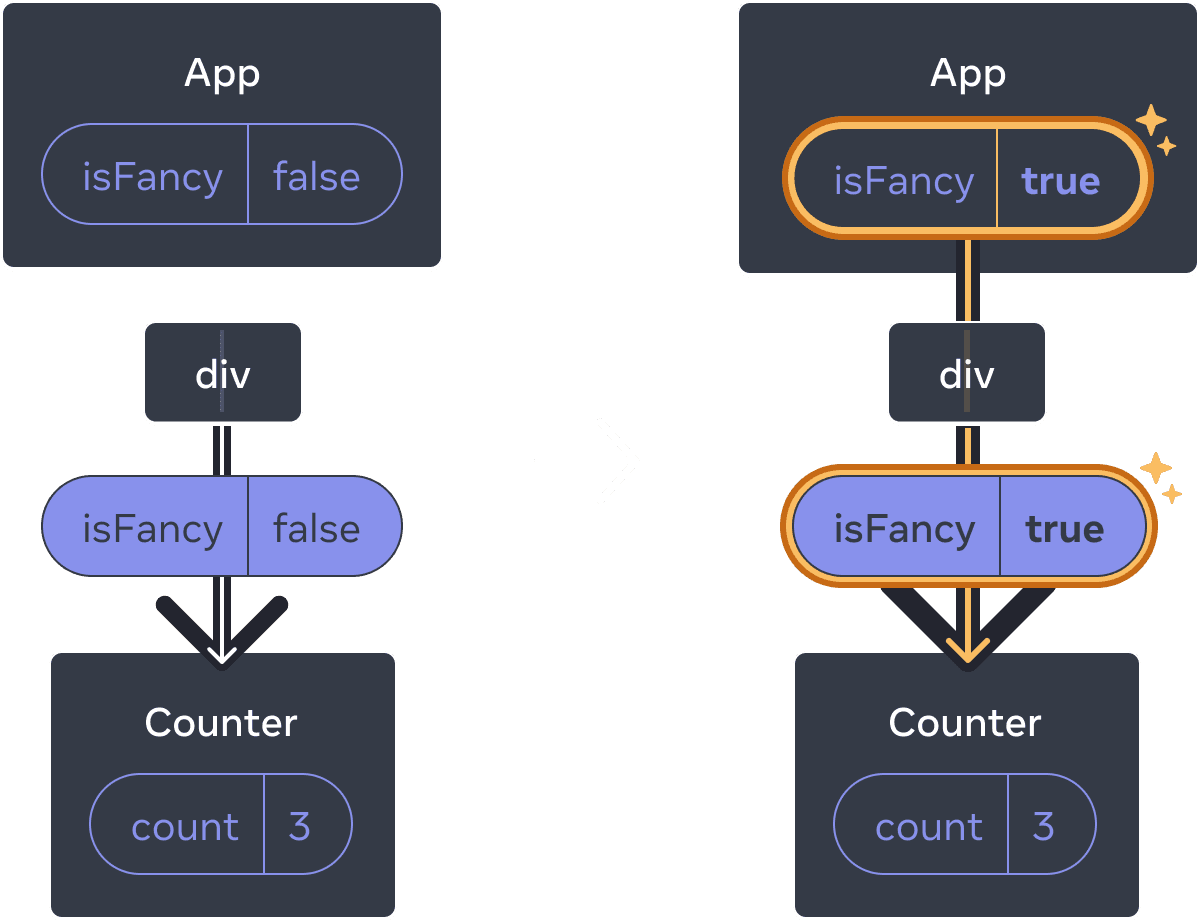
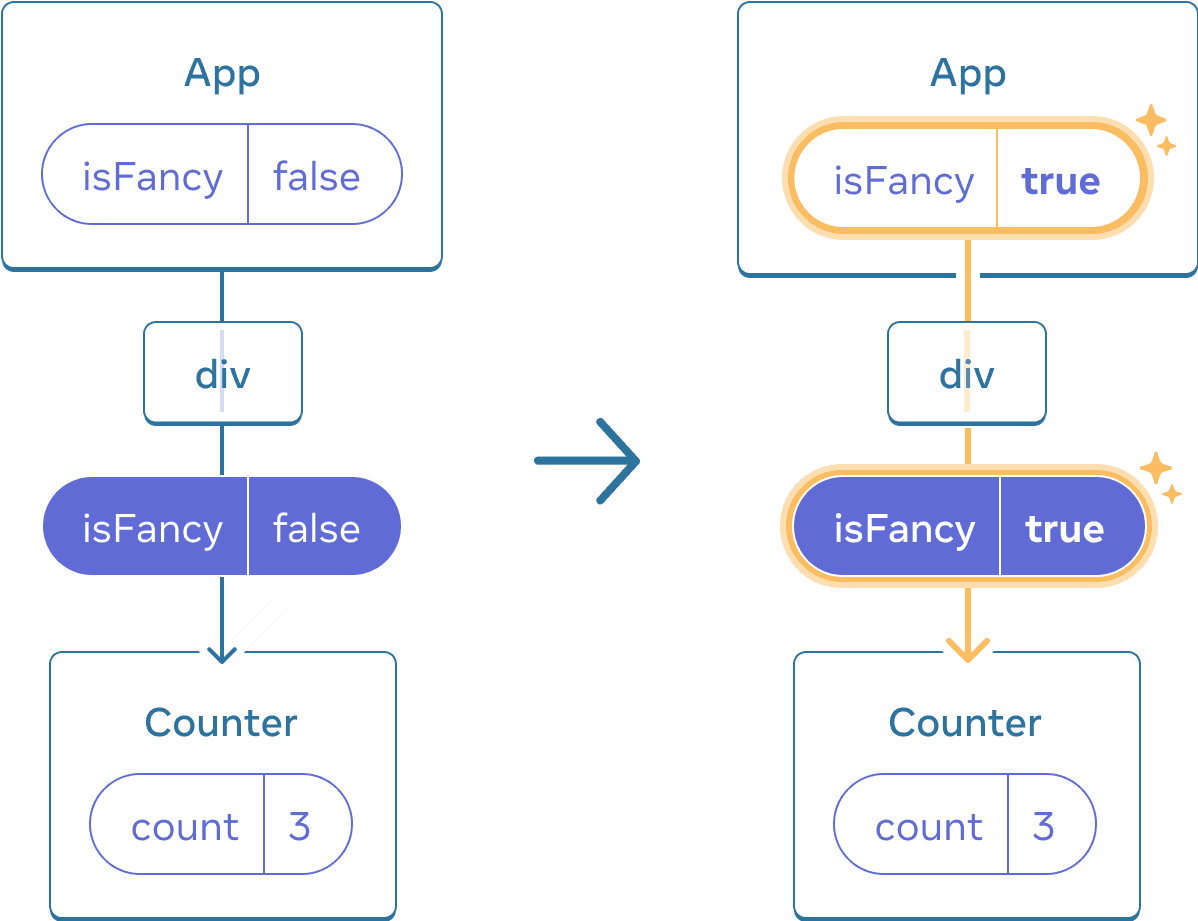
`App` 状態を更新しても、`Counter` は同じ位置にあるため、`Counter` はリセットされません。
`Counter` は同じ位置にある同じコンポーネントであるため、React の観点からは同じカウンターです。
同じ位置にある異なるコンポーネントは状態をリセットします
この例では、チェックボックスをオンにすると、<Counter>が<p>に置き換えられます。
import { useState } from 'react';

export default function App() {
  const [isPaused, setIsPaused] = useState(false);
  return (
    <div>
      {isPaused ? (
        <p>See you later!</p>
      ) : (
        <Counter />
      )}
      <label>
        <input
          type="checkbox"
          checked={isPaused}
          onChange={e => {
            setIsPaused(e.target.checked)
          }}
        />
        Take a break
      </label>
    </div>
  );
}

function Counter() {
  const [score, setScore] = useState(0);
  const [hover, setHover] = useState(false);

  let className = 'counter';
  if (hover) {
    className += ' hover';
  }

  return (
    <div
      className={className}
      onPointerEnter={() => setHover(true)}
      onPointerLeave={() => setHover(false)}
    >
      <h1>{score}</h1>
      <button onClick={() => setScore(score + 1)}>
        Add one
      </button>
    </div>
  );
}
ここでは、同じ位置で*異なる*コンポーネントタイプを切り替えます。 最初は、<div>の最初の子にはCounterが含まれていました。しかし、pに置き換えると、ReactはCounterをUIツリーから削除し、その状態を破棄しました。
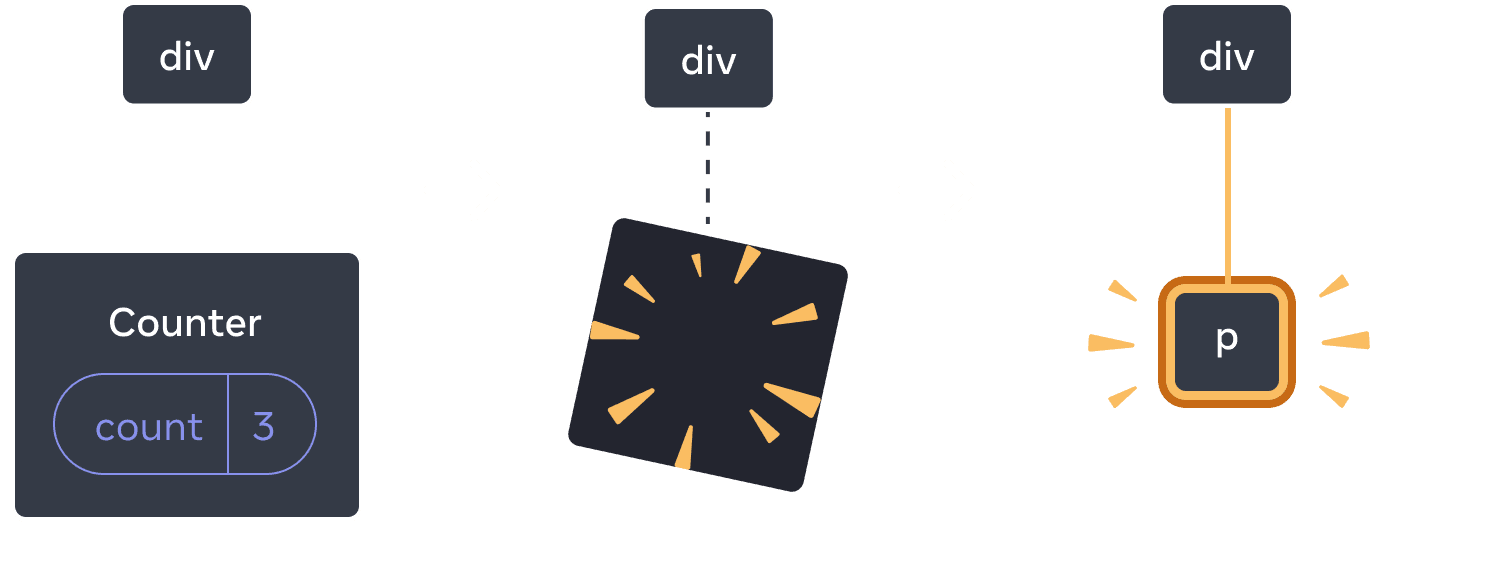
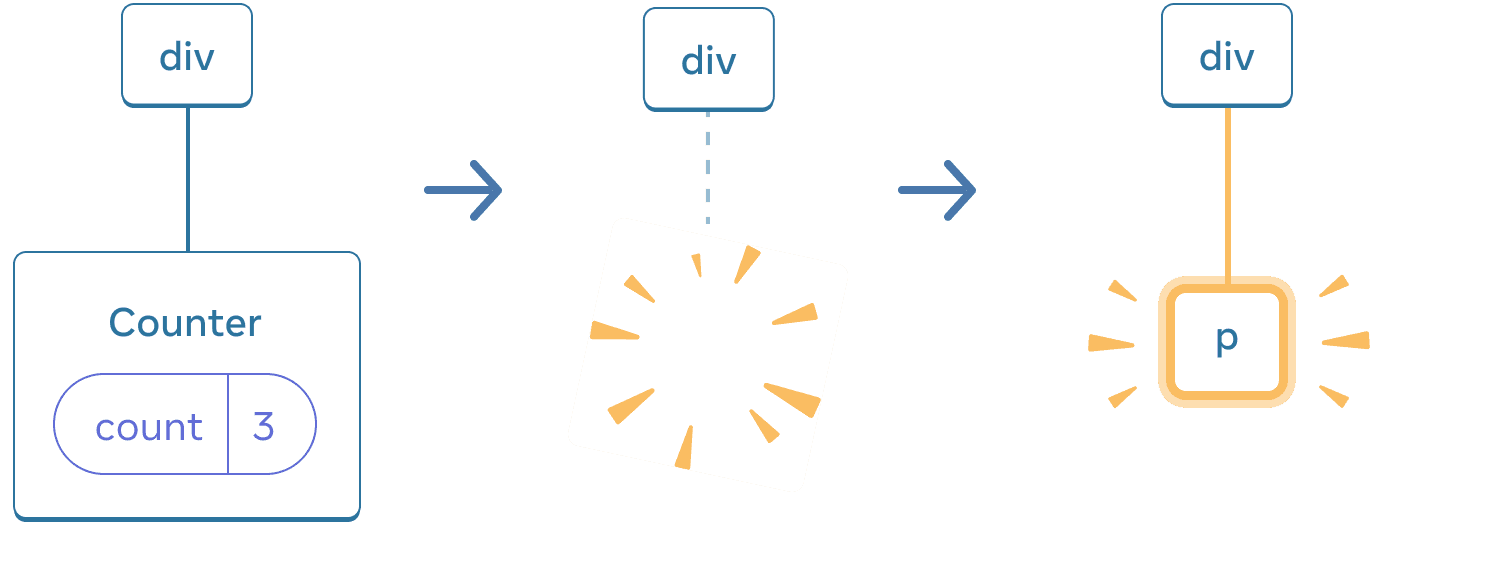
Counterがpに変更されると、Counterは削除され、pが追加されます。
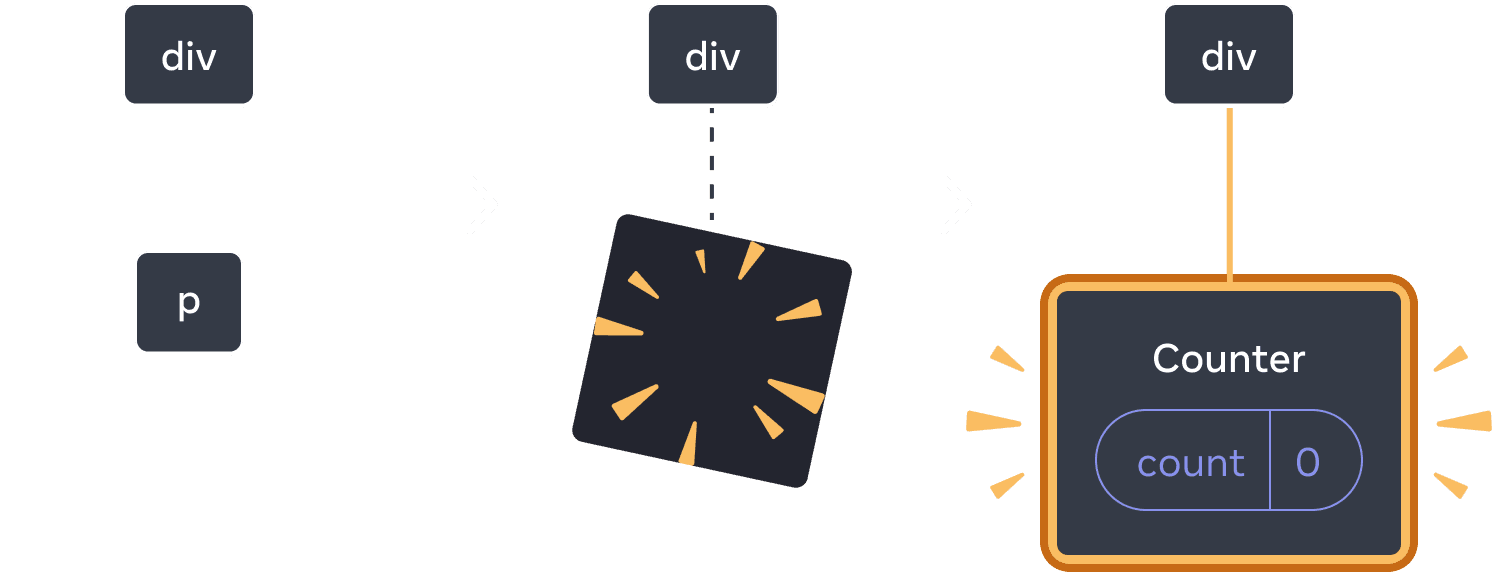
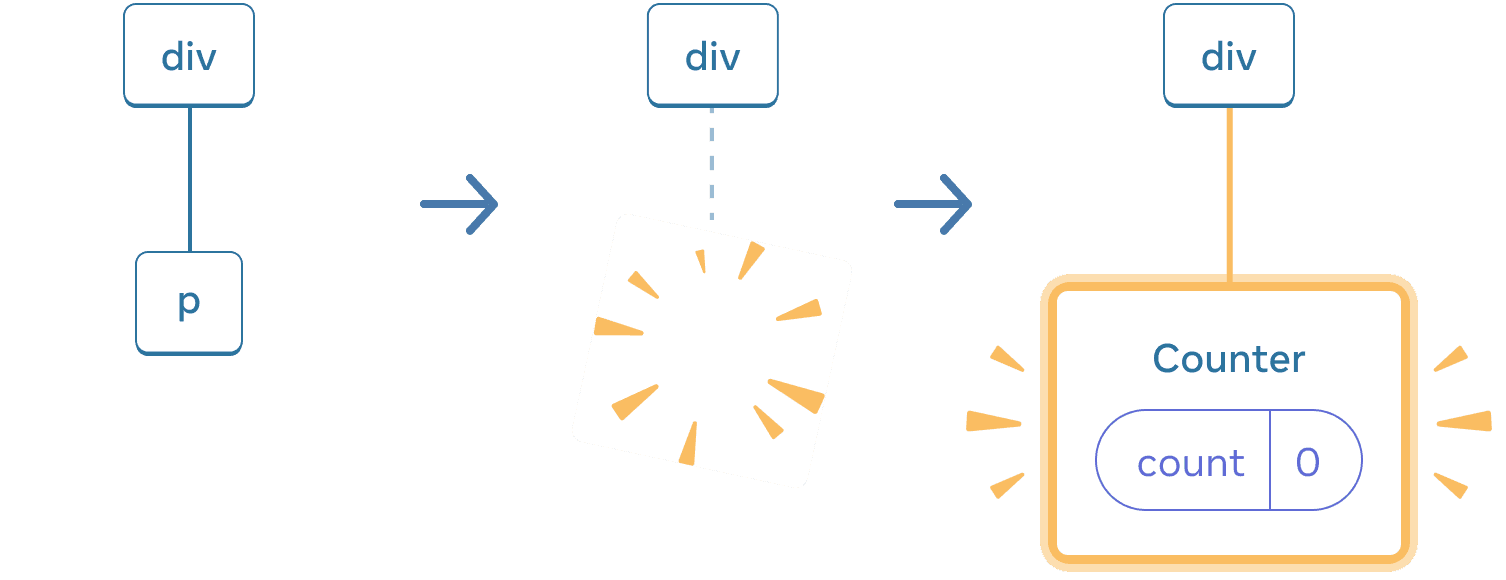
元に戻すと、pは削除され、Counterが追加されます。
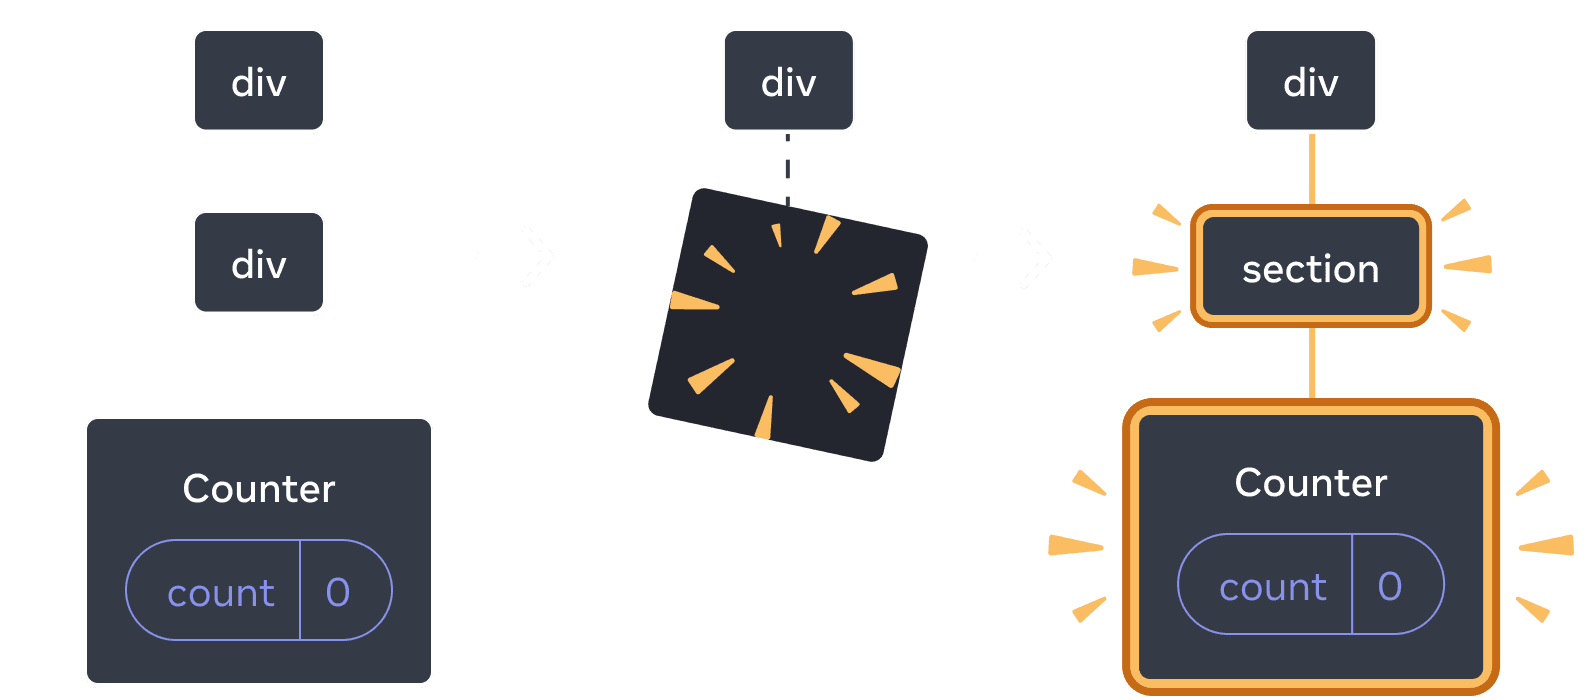
また、**同じ位置に異なるコンポーネントをレンダリングすると、そのサブツリー全体の状態がリセットされます。** これがどのように機能するかを確認するには、カウンターを増やしてからチェックボックスをオンにします。
import { useState } from 'react';

export default function App() {
  const [isFancy, setIsFancy] = useState(false);
  return (
    <div>
      {isFancy ? (
        <div>
          <Counter isFancy={true} />
        </div>
      ) : (
        <section>
          <Counter isFancy={false} />
        </section>
      )}
      <label>
        <input
          type="checkbox"
          checked={isFancy}
          onChange={e => {
            setIsFancy(e.target.checked)
          }}
        />
        Use fancy styling
      </label>
    </div>
  );
}

function Counter({ isFancy }) {
  const [score, setScore] = useState(0);
  const [hover, setHover] = useState(false);

  let className = 'counter';
  if (hover) {
    className += ' hover';
  }
  if (isFancy) {
    className += ' fancy';
  }

  return (
    <div
      className={className}
      onPointerEnter={() => setHover(true)}
      onPointerLeave={() => setHover(false)}
    >
      <h1>{score}</h1>
      <button onClick={() => setScore(score + 1)}>
        Add one
      </button>
    </div>
  );
}
チェックボックスをクリックすると、カウンターの状態がリセットされます。Counterをレンダリングしますが、divの最初の子はdivからsectionに変更されます。子divがDOMから削除されると、その下にあるツリー全体(Counterとその状態を含む)も破棄されました。
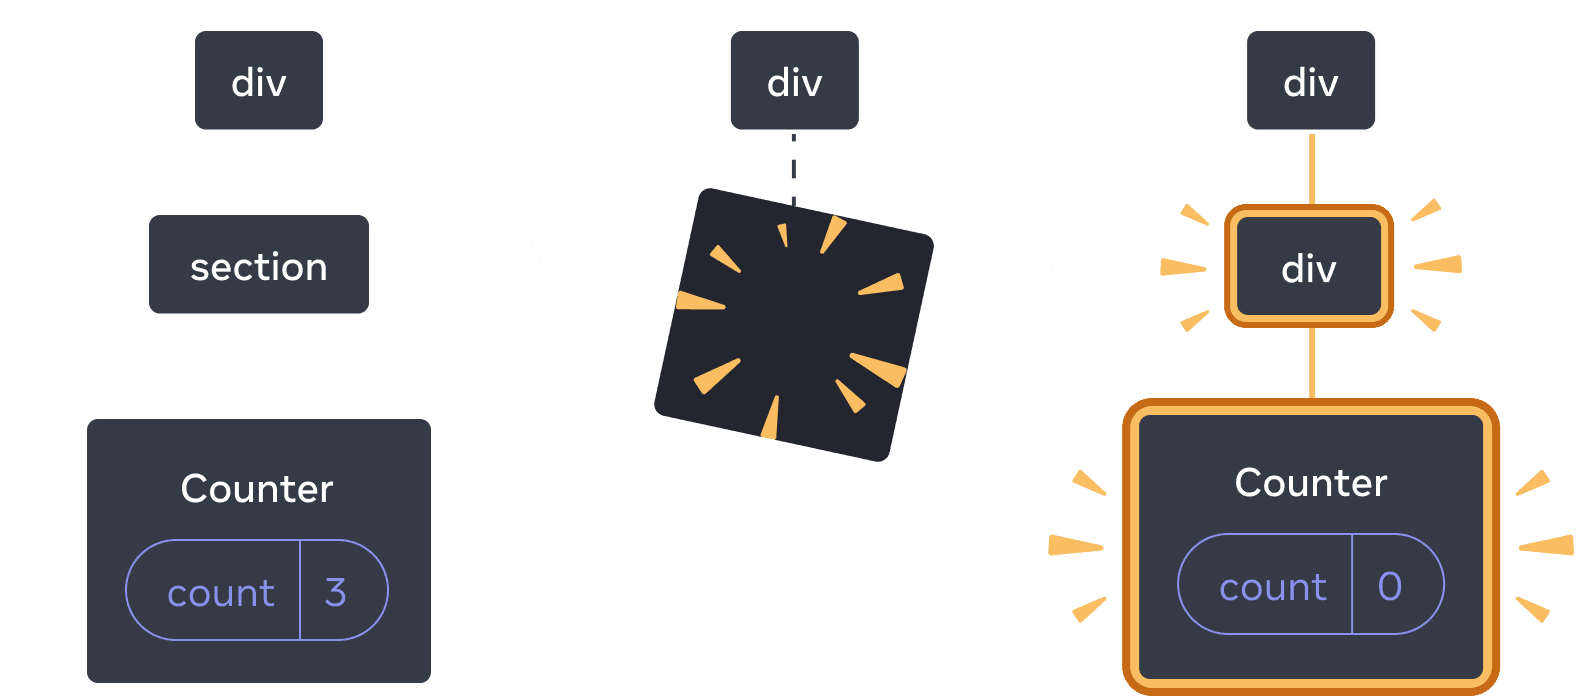
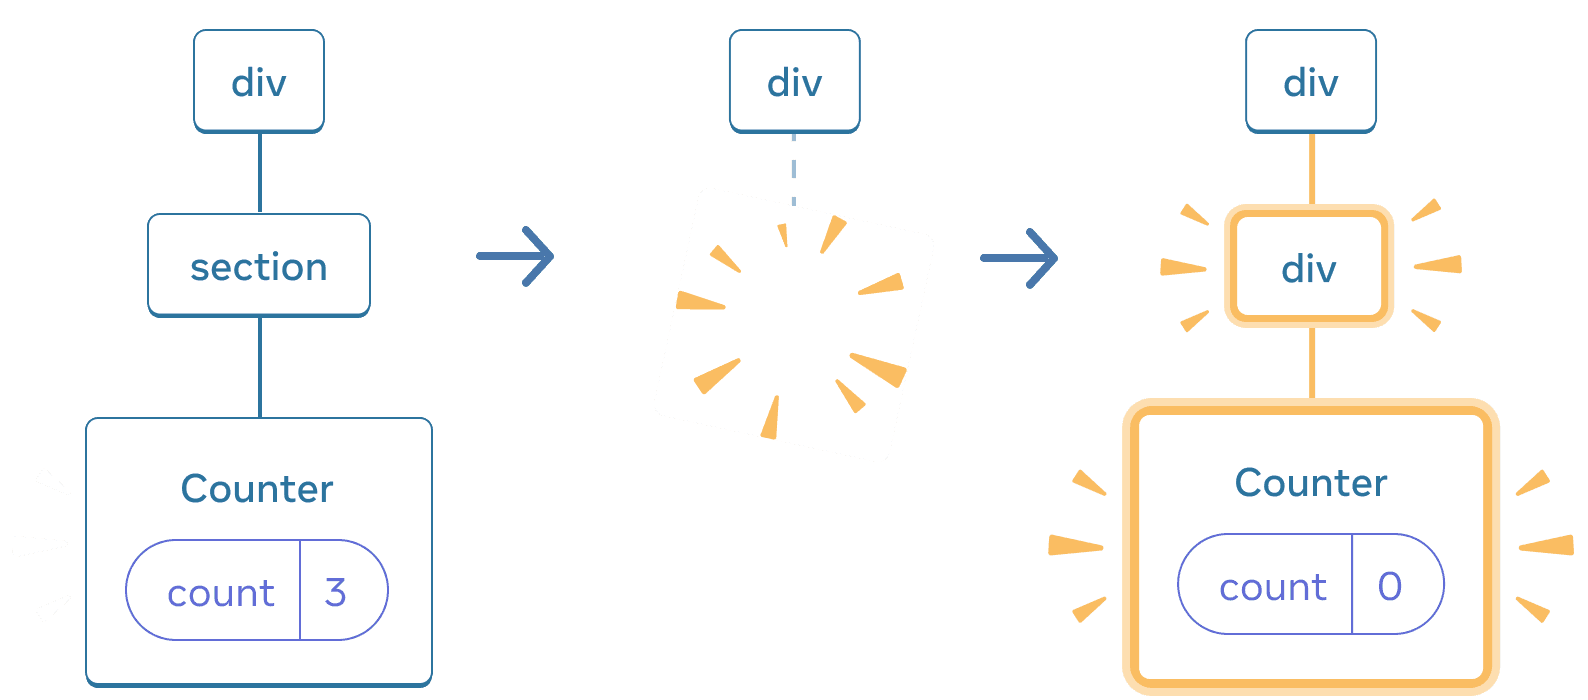
sectionがdivに変更されると、sectionは削除され、新しいdivが追加されます。

元に戻すと、divは削除され、新しいsectionが追加されます。
経験則として、**再レンダリング間で状態を保持したい場合は、ツリーの構造がレンダリングごとに「一致」する必要があります。** 構造が異なると、Reactはツリーからコンポーネントを削除するときに状態を破棄するため、状態は破棄されます。
同じ位置での状態のリセット
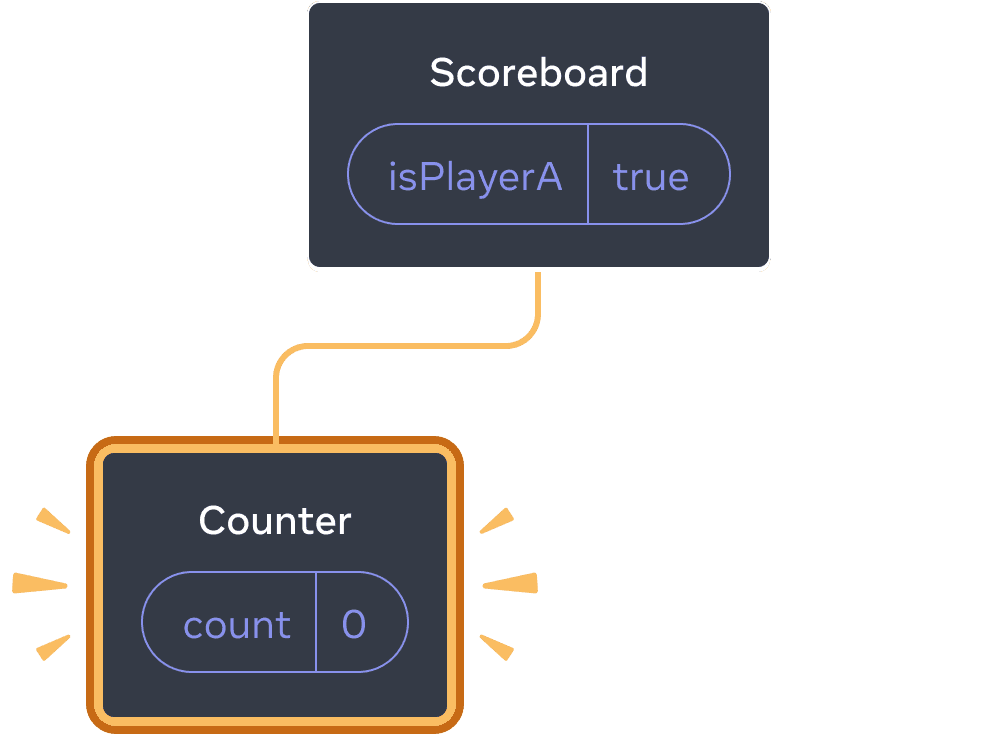
デフォルトでは、Reactはコンポーネントが同じ位置にある間、その状態を保持します。通常、これはまさにあなたが望むものなので、デフォルトの動作として理にかなっています。しかし、コンポーネントの状態をリセットしたい場合があります。2人のプレイヤーが各ターンの間にスコアを記録できるこのアプリを考えてみましょう。
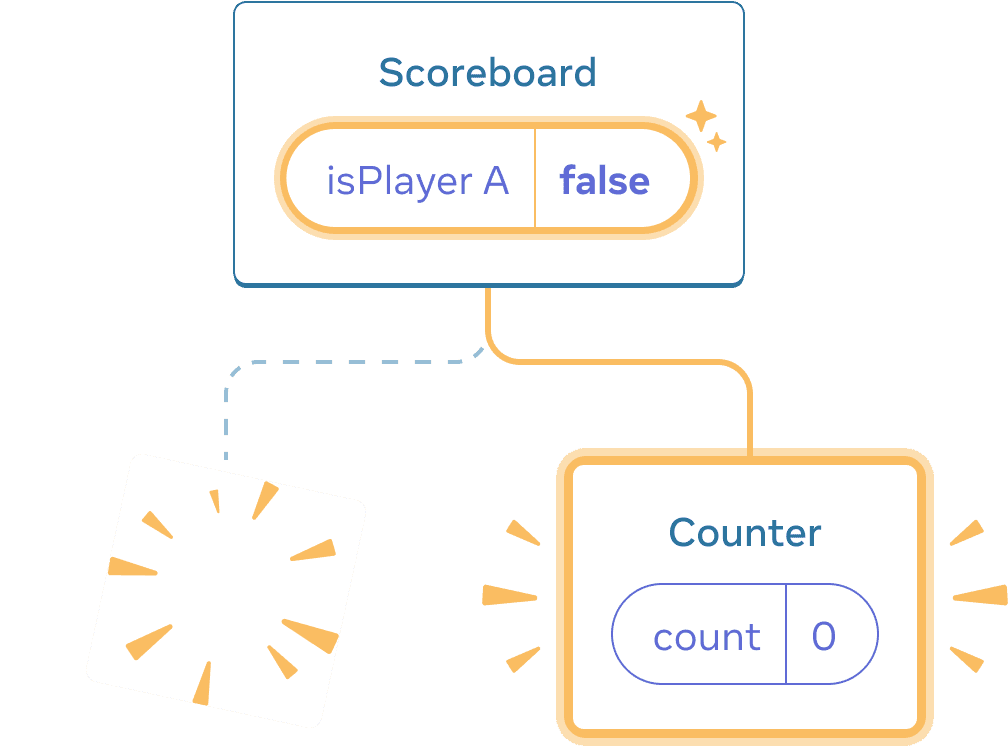
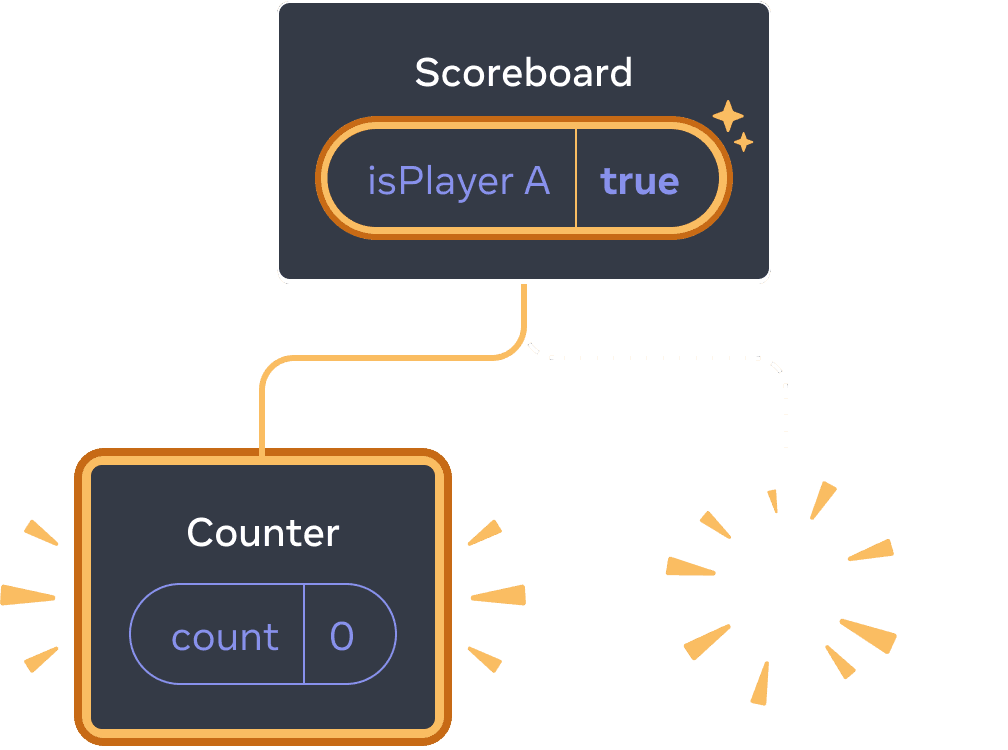
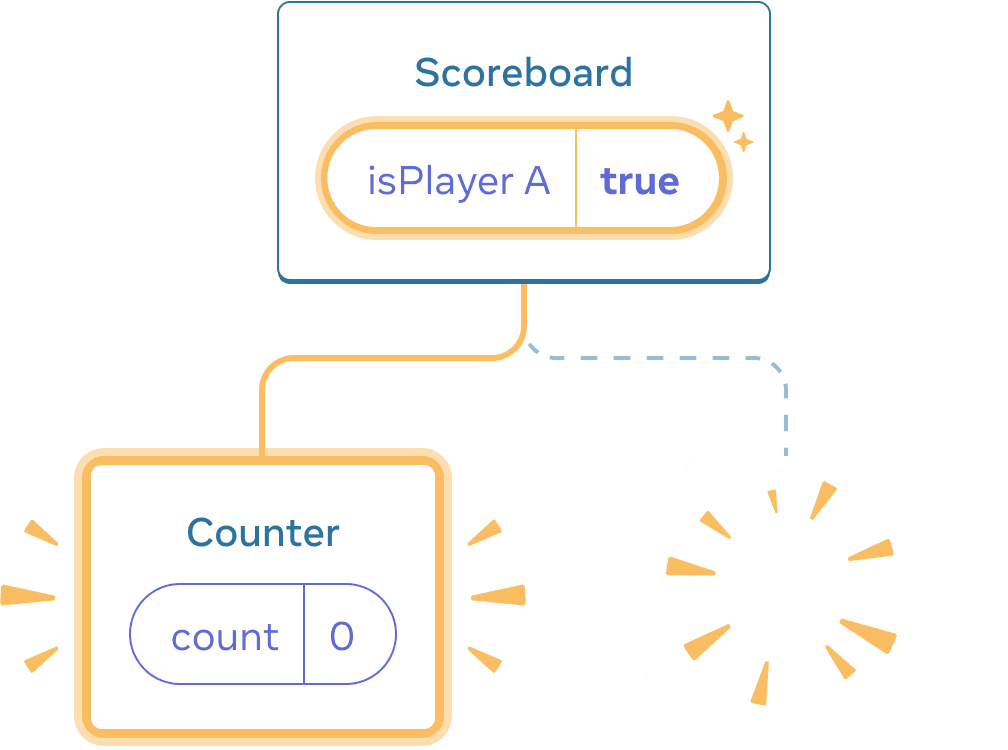
import { useState } from 'react';

export default function Scoreboard() {
  const [isPlayerA, setIsPlayerA] = useState(true);
  return (
    <div>
      {isPlayerA ? (
        <Counter person="Taylor" />
      ) : (
        <Counter person="Sarah" />
      )}
      <button onClick={() => {
        setIsPlayerA(!isPlayerA);
      }}>
        Next player!
      </button>
    </div>
  );
}

function Counter({ person }) {
  const [score, setScore] = useState(0);
  const [hover, setHover] = useState(false);

  let className = 'counter';
  if (hover) {
    className += ' hover';
  }

  return (
    <div
      className={className}
      onPointerEnter={() => setHover(true)}
      onPointerLeave={() => setHover(false)}
    >
      <h1>{person}'s score: {score}</h1>
      <button onClick={() => setScore(score + 1)}>
        Add one
      </button>
    </div>
  );
}
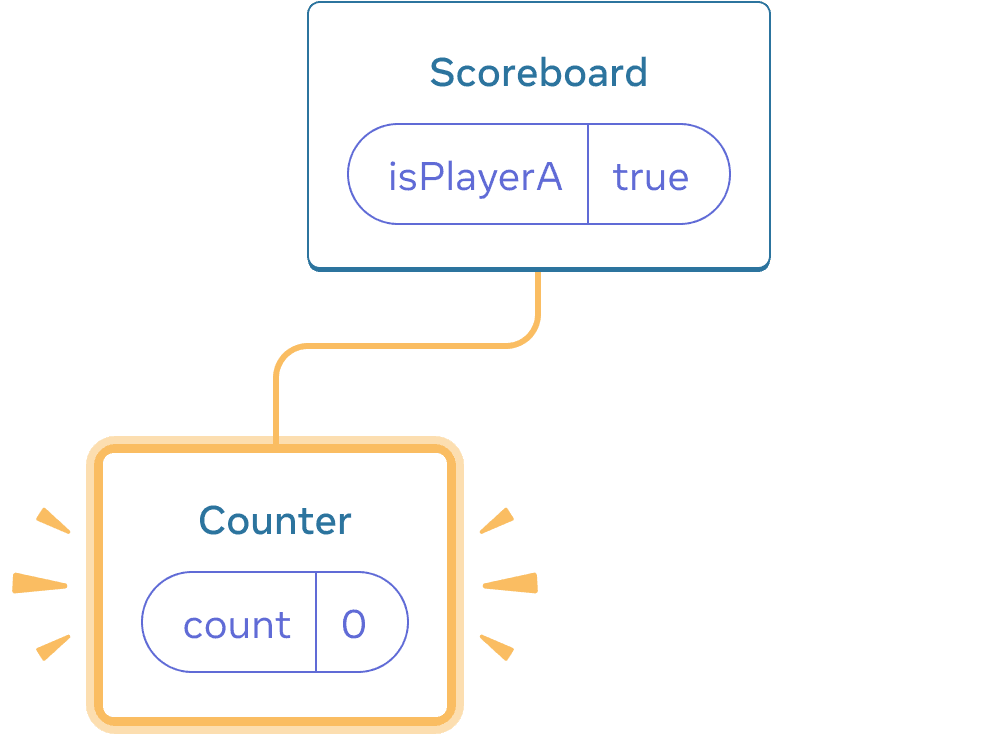
現在、プレイヤーを変更しても、スコアは保持されます。2つのCounterは同じ位置に表示されるため、Reactはそれらをpersonプロップが変更された*同じ*Counterと見なします。
しかし、概念的には、このアプリでは、それらは2つの別々のカウンターである必要があります。UIの同じ場所に表示される場合がありますが、1つはTaylorのカウンター、もう1つはSarahのカウンターです。
それらの間で切り替えるときに状態をリセットするには、2つの方法があります。
- コンポーネントを異なる位置にレンダリングする
keyを使用して各コンポーネントに明示的なIDを与える
オプション1:コンポーネントを異なる位置にレンダリングする
これら2つのCounterを独立させたい場合は、2つの異なる位置にレンダリングできます。
import { useState } from 'react';

export default function Scoreboard() {
  const [isPlayerA, setIsPlayerA] = useState(true);
  return (
    <div>
      {isPlayerA &&
        <Counter person="Taylor" />
      }
      {!isPlayerA &&
        <Counter person="Sarah" />
      }
      <button onClick={() => {
        setIsPlayerA(!isPlayerA);
      }}>
        Next player!
      </button>
    </div>
  );
}

function Counter({ person }) {
  const [score, setScore] = useState(0);
  const [hover, setHover] = useState(false);

  let className = 'counter';
  if (hover) {
    className += ' hover';
  }

  return (
    <div
      className={className}
      onPointerEnter={() => setHover(true)}
      onPointerLeave={() => setHover(false)}
    >
      <h1>{person}'s score: {score}</h1>
      <button onClick={() => setScore(score + 1)}>
        Add one
      </button>
    </div>
  );
}
- 最初は、
isPlayerAはtrueです。そのため、最初の位置にはCounterの状態が含まれ、2番目の位置は空です。 - 「次のプレイヤー」ボタンをクリックすると、最初の位置はクリアされますが、2番目の位置には
Counterが含まれるようになります。
初期状態
「次へ」をクリックする
「次へ」をもう一度クリックする
各Counterの状態は、DOMから削除されるたびに破棄されます。これが、ボタンをクリックするたびにリセットされる理由です。
この解決策は、同じ場所にレンダリングされる独立したコンポーネントが少数の場合に便利です。この例では、2つしかないため、JSXで両方を個別にレンダリングするのは面倒ではありません。
オプション2:keyを使った状態のリセット
コンポーネントの状態をリセットする、より汎用的な方法もあります。
リストをレンダリングする際に、keyを見たことがあるかもしれません。keyはリストのためだけではありません! keyを使用して、Reactが任意のコンポーネントを区別できるようにすることができます。デフォルトでは、Reactは親内の順序(「最初のカウンター」、「2番目のカウンター」)を使用してコンポーネントを識別します。しかし、keyを使用すると、Reactにこれは単なる*最初の*カウンターや*2番目の*カウンターではなく、特定のカウンター(たとえば、*Taylorの*カウンター)であることを伝えることができます。このように、Reactはツリーのどこに表示されても*Taylorの*カウンターを認識します!
この例では、2つの<Counter />は、JSXの同じ場所に表示されていても、状態を共有しません。
import { useState } from 'react';

export default function Scoreboard() {
  const [isPlayerA, setIsPlayerA] = useState(true);
  return (
    <div>
      {isPlayerA ? (
        <Counter key="Taylor" person="Taylor" />
      ) : (
        <Counter key="Sarah" person="Sarah" />
      )}
      <button onClick={() => {
        setIsPlayerA(!isPlayerA);
      }}>
        Next player!
      </button>
    </div>
  );
}

function Counter({ person }) {
  const [score, setScore] = useState(0);
  const [hover, setHover] = useState(false);

  let className = 'counter';
  if (hover) {
    className += ' hover';
  }

  return (
    <div
      className={className}
      onPointerEnter={() => setHover(true)}
      onPointerLeave={() => setHover(false)}
    >
      <h1>{person}'s score: {score}</h1>
      <button onClick={() => setScore(score + 1)}>
        Add one
      </button>
    </div>
  );
}
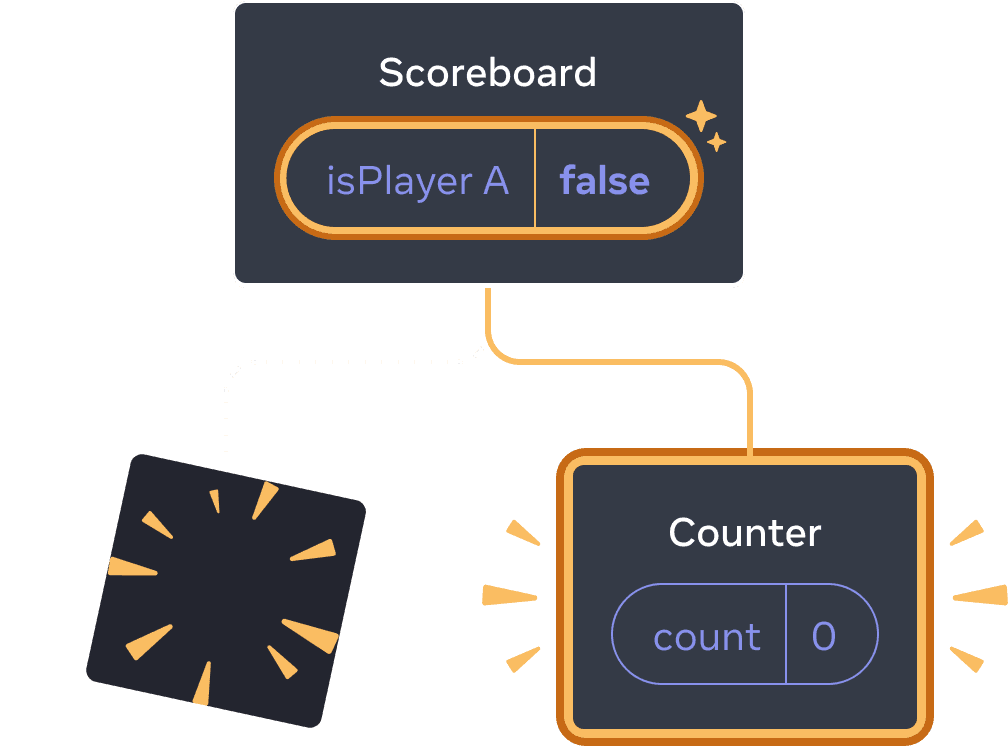
TaylorとSarahを切り替えても、状態は保持されません。これは、異なるkeyを指定したためです。
{isPlayerA ? (
  <Counter key="Taylor" person="Taylor" />
) : (
  <Counter key="Sarah" person="Sarah" />
)}keyを指定すると、Reactは親内での順序ではなく、key自体を位置の一部として使用します。そのため、JSXの同じ場所にレンダリングしても、Reactはそれらを2つの異なるカウンターと見なすため、状態を共有することはありません。カウンターが画面に表示されるたびに、その状態が作成されます。削除されるたびに、その状態は破棄されます。それらを切り替えると、状態が何度もリセットされます。
keyを使ったフォームのリセット (略:SVGアイコン)
keyを使った状態のリセットは、フォームを扱う場合に特に便利です。
このチャットアプリでは、<Chat>コンポーネントにテキスト入力の状態が含まれています。
import { useState } from 'react';
import Chat from './Chat.js';
import ContactList from './ContactList.js';

export default function Messenger() {
  const [to, setTo] = useState(contacts[0]);
  return (
    <div>
      <ContactList
        contacts={contacts}
        selectedContact={to}
        onSelect={contact => setTo(contact)}
      />
      <Chat contact={to} />
    </div>
  )
}

const contacts = [
  { id: 0, name: 'Taylor', email: 'taylor@mail.com' },
  { id: 1, name: 'Alice', email: 'alice@mail.com' },
  { id: 2, name: 'Bob', email: 'bob@mail.com' }
];
入力欄に何か入力し、「Alice」または「Bob」を押して別の受信者を選択してみてください。 <Chat>はツリーの同じ位置にレンダリングされるため、入力状態は保持されます。
多くのアプリでは、これは望ましい動作かもしれませんが、チャットアプリではそうではありません! 誤ってクリックしたために、ユーザーが誤った相手に既に 入力したメッセージを送信できるようにしたくありません。これを修正するには、keyを追加します。
<Chat key={to.id} contact={to} />これにより、別の受信者を選択すると、Chatコンポーネントが、その下のツリー内の状態を含め、最初から再作成されます。 Reactは、DOM要素を再利用する代わりに、再作成します。
これで、受信者を切り替えると、常にテキストフィールドがクリアされます。
import { useState } from 'react';
import Chat from './Chat.js';
import ContactList from './ContactList.js';

export default function Messenger() {
  const [to, setTo] = useState(contacts[0]);
  return (
    <div>
      <ContactList
        contacts={contacts}
        selectedContact={to}
        onSelect={contact => setTo(contact)}
      />
      <Chat key={to.id} contact={to} />
    </div>
  )
}

const contacts = [
  { id: 0, name: 'Taylor', email: 'taylor@mail.com' },
  { id: 1, name: 'Alice', email: 'alice@mail.com' },
  { id: 2, name: 'Bob', email: 'bob@mail.com' }
];
詳細
削除されたコンポーネントの状態の保持 (略:SVGアイコン)
削除されたコンポーネントの状態の保持 (略:SVGアイコン)
実際のチャットアプリでは、ユーザーが以前の受信者を再度選択したときに、入力状態を復元したい場合があります。表示されなくなったコンポーネントの 状態を「維持」するには、いくつかの方法があります。
- 現在のチャットだけでなく*すべて*のチャットをレンダリングし、CSSで他のすべてを非表示にすることができます。チャットはツリーから削除されないため、ローカル状態は保持されます。この解決策は、単純なUIに最適です。ただし、非表示のツリーが大きく、多くのDOMノードが含まれている場合、非常に遅くなる可能性があります。
- 状態を上位に持ち上げて、親コンポーネントで各受信者の保留中のメッセージを保持することができます。このように、子コンポーネントが削除されても、重要な情報を保持しているのは親であるため、問題ありません。これは最も一般的な解決策です。
- Reactの状態に加えて、別のソースを使用することもできます。たとえば、ユーザーが誤ってページを閉じた場合でも、メッセージの下書きを保持したい場合があります。これを実装するには、
ChatコンポーネントにlocalStorageから読み取って状態を初期化し、下書きもそこに保存させることができます。
どの戦略を選択しても、*Aliceとの*チャットは*Bobとの*チャットとは概念的に異なるため、現在の受信者に基づいて<Chat>ツリーにkeyを付けることは理にかなっています。
要約(略:SVGアイコン)
- Reactは、同じコンポーネントが同じ位置にレンダリングされている限り、状態を保持します。
- 状態はJSXタグには保持されません。JSXを配置したツリーの位置に関連付けられています。
- 異なるkeyを付けることで、サブツリーに状態をリセットさせることができます。
- コンポーネント定義をネストしないでください。そうしないと、誤って状態がリセットされます。
チャレンジ 1の 5: 消える入力テキストを修正する
この例では、ボタンを押すとメッセージが表示されます。しかし、ボタンを押すと誤って入力がリセットされてしまいます。なぜこうなるのでしょうか?ボタンを押しても入力テキストがリセットされないように修正してください。
import { useState } from 'react';

export default function App() {
  const [showHint, setShowHint] = useState(false);
  if (showHint) {
    return (
      <div>
        <p><i>Hint: Your favorite city?</i></p>
        <Form />
        <button onClick={() => {
          setShowHint(false);
        }}>Hide hint</button>
      </div>
    );
  }
  return (
    <div>
      <Form />
      <button onClick={() => {
        setShowHint(true);
      }}>Show hint</button>
    </div>
  );
}

function Form() {
  const [text, setText] = useState('');
  return (
    <textarea
      value={text}
      onChange={e => setText(e.target.value)}
    />
  );
}